How To Tie A Tie
For any gentleman out there, knowing how to tie a tie is an essential skill but sometimes a daunting task. Here are six easy tie knots that will have you looking sharp and put-together in no time:
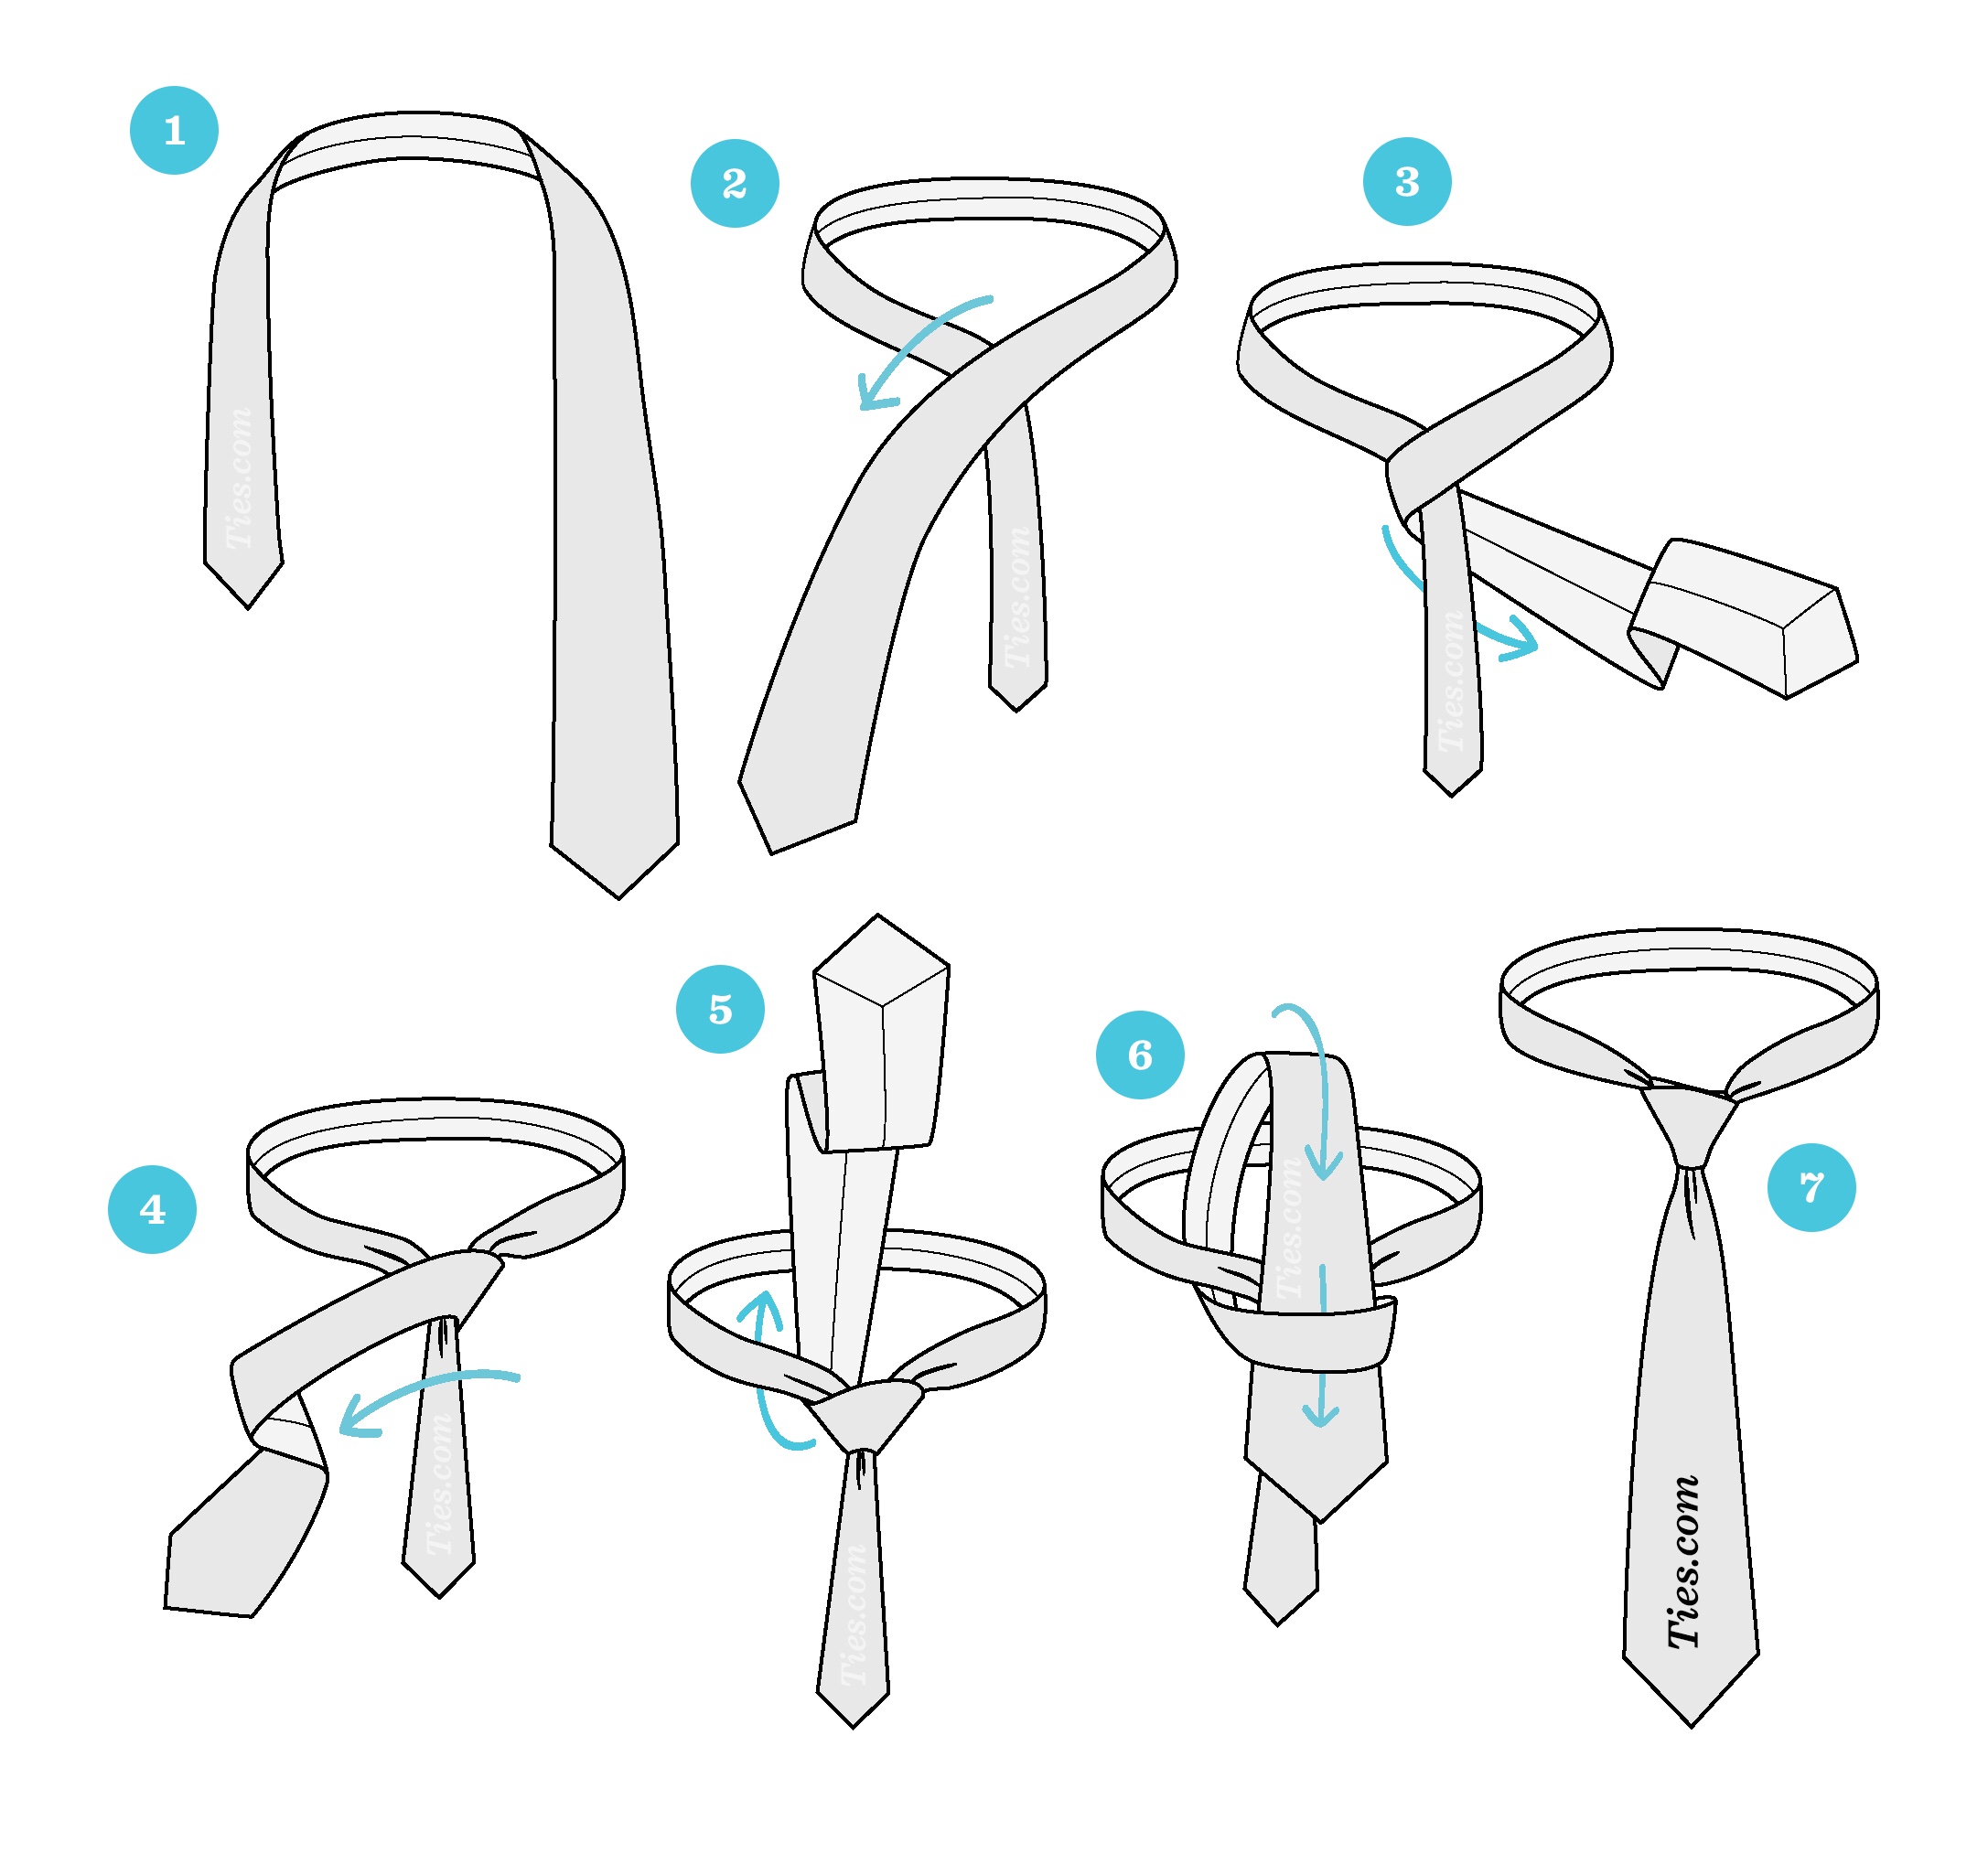
The Four-In-Hand Knot
The four-in-hand knot is the most basic and simple knot to start with. It is a narrow, slightly asymmetrical knot that works best with a standard collar and narrow tie. Simply follow these steps:
- Arrange the tie around your collar with the thick end on your right side and the narrow end on your left. The narrow end should be about a foot higher than the thick end.
- Cross the thick end over the narrow end.
- Wrap the thick end behind the narrow end.
- Bring the thick end back in front of the narrow end.
- Wrap the thick end over and behind the narrow end once more.
- Bring the thick end up through the loop around your neck.
- Hold the knot with your index finger and bring the thick end down through the knot.
- Tighten and adjust as needed
The Windsor Knot
The Windsor knot is a symmetrical and wide knot that works best with spread collar shirts and thicker ties. Follow these steps:
- Arrange the tie with the thick end on your right side and the narrow end on your left. The narrow end should be a few inches lower than the thick end.
- Bring the thick end over the narrow end.
- Wrap the thick end behind the narrow end.
- Bring the thick end up and over the loop around your neck.
- Bring the thick end down through the loop between the tie and the collar.
- Wrap the thick end behind the narrow end.
- Bring the thick end up and over the loop again.
- Bring the thick end down through the loop again.
- Tighten and adjust the knot as needed.
The Half-Windsor Knot

The half-Windsor knot is a versatile knot that works well with most shirts and ties and is a bit smaller than the Windsor knot. Follow these steps:
- Arrange the tie with the thick end on your right side and the narrow end on your left. The narrow end should be a few inches lower than the thick end.
- Bring the thick end over the narrow end.
- Wrap the thick end behind the narrow end.
- Bring the thick end up and over the loop around your neck.
- Bring the thick end down through the loop between the tie and the collar.
- Bring the thick end up and over the narrow end.
- Wrap the thick end behind the narrow end.
- Bring the thick end up and over the loop around your neck.
- Bring the thick end down through the loop between the tie and the collar.
- Tighten and adjust the knot as needed.
The Pratt Knot

The Pratt knot, also known as the Shelby knot, is a versatile and easy knot that works best with standard spread collar shirts and medium-sized ties. Follow these steps:
- Arrange the tie with the thick end on your right side and the narrow end on your left. The narrow end should be a few inches lower than the thick end.
- Cross the thick end over the narrow end.
- Wrap the thick end behind the narrow end.
- Bring the thick end up and over the loop around your neck.
- Bring the thick end down through the loop between the tie and the collar.
- Bring the thick end, horizontally, across the front of the knot from right to left.
- Wrap the thick end behind the knot and bring it back up across the front from left to right.
- Bring the thick end down through the loop between the tie and the collar.
- Tighten and adjust as needed.
The Kelvin Knot
The Kelvin knot is a relatively new knot that combines the four-in-hand knot with the Pratt knot. It is a petite and symmetrical knot that works well with most shirt collars and ties. Follow these steps:
- Arrange the tie with the thick end on your right side and the narrow end on your left. The narrow end should be a few inches lower than the thick end.
- Cross the thick end over the narrow end.
- Wrap the thick end behind the narrow end.
- Bring the thick end up and over the loop around your neck.
- Bring the thick end down through the loop between the tie and the collar.
- Bring the thick end up and over the narrow end.
- Wrap the thick end behind the knot and bring it up between the knot and the collar loop.
- Bring the thick end down through the loop that has been created and tighten the knot.
- Adjust as needed.
The Eldredge Knot

The Eldredge knot is a complex and eye-catching knot that is sure to impress. It is best worn with a solid colored tie and a patternless shirt. Follow these steps:
- Arrange the tie with the thick end on your right side and the narrow end on your left. The narrow end should be a few inches lower than the thick end.
- Bring the thick end horizontally across the narrow end.
- Bring the thick end up and over the loop around your neck.
- Bring the thick end horizontally over the front of the knot from right to left.
- Wrap the thick end behind the knot and bring it up towards the neck loop from the bottom and back down around the knot to the left side.
- Bring the thick end horizontally over the front of the knot from right to left again.
- Tuck the thick end up behind the neck loop and bring it back down through the knot on the opposite side.
- Wrap the thick end in front of the knot and tuck it up behind the neck loop from the bottom and then back down through the knot.
- Bring the thick end up and over the knot from right to left.
- Tuck the thick end behind the knot and bring it up through the neck loop.
- Bring the thick end down and tuck it behind the knot.
- Adjust the knot and collar as needed.
Now that you have learned the six easy tie knots, you can elevate your style and look sharp no matter the occasion.
Tips:
- For a sleek look, use a tie clip to keep your tie in place.
- Choose a tie that complements your outfit and your personal style.
- Consider the occasion and dress accordingly.
Ideas:
- Accessorize your tie with a pocket square or lapel pin.
- Try different fabrics and patterns to add dimension to your outfit.
- Experiment with different knot variations to find your signature look.
How to:
- Practice tying your tie in front of a mirror to perfect your technique.
- Watch tutorials and read guides to learn different variations and tips.
- Take time to choose the perfect tie and practice tying it to ensure a polished and put-together look.
If you are looking for The finer details of how to tie a tie you've visit to the right place. We have 7 Pics about The finer details of how to tie a tie like How to Tie a Tie: 6 Easy Tie Knots, 5 Amazing ways to tie a tie - YouTube and also 5 Amazing ways to tie a tie - YouTube. Here you go:
The Finer Details Of How To Tie A Tie
blog.beirutshopping.com tie knot hand four step ties como windsor instructions tying balthus knots gravata big para amarrar tipos right murrell rope
How To Tie The Perfect Tie Knot...Better | GQ
www.gq.com tie gq knot perfect way
How To Tie A Tie: 6 Easy Tie Knots
 www.theknot.com
 tie easy knots bow step video raisa zwart photography
Hex Tie | Ties For Modern Gentlemen | Style And Outfits From Hextie
www.hextie.com tie hextie easiest
8 Different Ways To Tie A Necktie . How To Tie A Tie - YouTube
 www.youtube.com
 tie different ways necktie knots types ties knot cool make adding suit idea good easy other
5 Amazing Ways To Tie A Tie - YouTube
 www.youtube.com
 tie ways amazing
30 Different Ways To Tie A Tie That Every Man Should Know | HuffPost
 www.huffingtonpost.com
 tie ties different ways neck necktie knots man neckties knot mens unusual way men cool long every creative list know
8 different ways to tie a necktie . how to tie a tie. Tie easy knots bow step video raisa zwart photography. Tie knot hand four step ties como windsor instructions tying balthus knots gravata big para amarrar tipos right murrell rope

Post a Comment for "How To Tie A Tie"